What Happens During a Siding Replacement, Step by Step
A siding replacement is less mysterious once you know the order the work happens in, so here is the job from first scrape to final walk-around.
October 13, 2026 · 4 min read
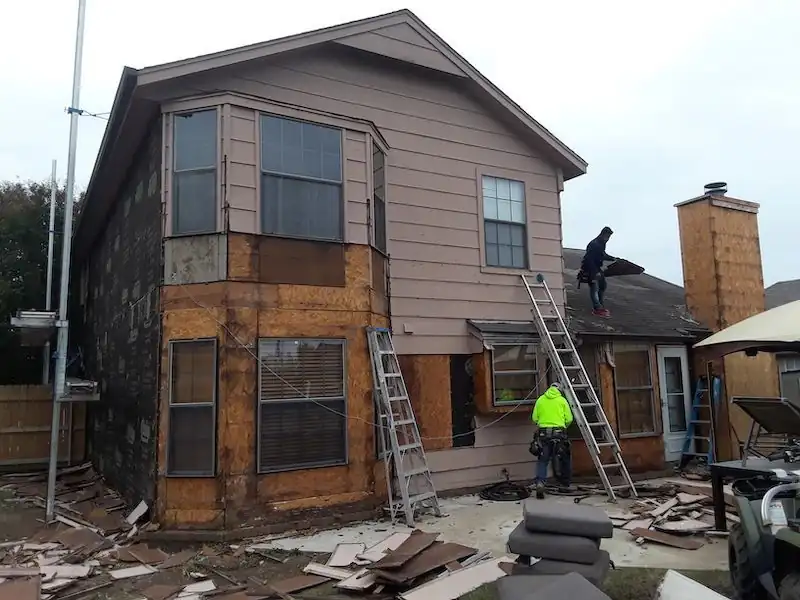
Most homeowners have never watched a full siding replacement. You see the truck show up, then the house looks stripped, then it looks new. What happens in between is where the quality of the job gets decided, and knowing the sequence helps you ask better questions and spot shortcuts.
Every house is different, and the exact schedule depends on size, weather and what's hiding under the old siding. But the order of operations is remarkably consistent. Here is how we approach it at Oklahoma Siding, from the first day to the last walk-through.
Step one: protect the property and tear off the old siding
Before anything comes off the walls, the crew covers shrubs, grills, patio furniture and anything else near the house. Old siding, nails and trim scraps fall fast, and a few minutes of prep saves your landscaping. A dumpster or a staging spot for debris goes where it won't block your driveway more than necessary.
Then the old siding comes off, usually working in sections. This is the loudest, messiest part of the job, and it's also the first time anyone sees what the walls look like underneath. That is the reason a good estimate is a starting point and not a guarantee of what we'll find.
Step two: check the sheathing and fix what's wrong
The sheathing is the layer of boards or panels the siding is fastened to. With the old siding gone, we look it over closely. Dark stains, soft spots, crumbling edges and old water damage all show up here, and they're much easier to deal with now than after the new siding is on.
Sound sheathing stays. Damaged sections get cut out and replaced. We also look at the framing around windows and doors, since that's where leaks tend to start. Wood rot is one of the things we repair, and a siding job is the best moment to catch it, because the whole wall is open.
Step three: house wrap, flashing and trim details
Once the walls are solid, the house wrap goes up. It's the weather-resistant layer that sits between the sheathing and the siding, and its job is to shed any water that gets behind the planks. You can see it in some of our job photos, a white or silver membrane covering a house in the middle of a project.
Flashing goes in around windows, doors and other openings, lapped so water runs out and away instead of in. This is not glamorous work, and you will never see it again once the siding is on. It's also where a lot of long-term leaks come from when it's skipped or done carelessly, so we slow down here.
Step four: planks go on, bottom to top
James Hardie planks are installed from the bottom of the wall to the top, each course overlapping the one below it so water runs down and off, not behind. The first course sets the line for everything above it, so the crew spends real time getting it level before nailing off the rest.
- Planks are cut to fit at corners, windows and doors, and cut edges are sealed or finished according to the material's requirements.
- Fasteners go in at the correct spacing and depth so the planks sit flat and aren't over-driven.
- Joints are staggered so the seams don't line up in a column up the wall.
- Gaps and edges that meet trim are caulked with an exterior-grade sealant.
Step five: trim, corners and soffits
Trim is what makes siding look finished. Corners, window and door surrounds, and the trim along the roofline and under the eaves all get installed or replaced so the new walls look intentional. If the old trim is rotted, it comes off for good rather than being covered, because new siding over bad wood just hides the problem for a while.
Soffits, the underside of the eaves, are often handled at this stage when they're damaged or need updating. Our gallery shows vented soffit panels and open framing from jobs where they were part of the project. If yours need attention, mention it during the estimate so it gets priced up front.
Step six: paint, cleanup and the final walk-around
Depending on the job, paint is applied to the planks and trim, and the finish coat is where the wall really starts to look new. Good prep, covered in another article on this site, matters even more here than on a repaint, because new material and sealed joints give paint its best chance of lasting.
Cleanup should leave the yard the way you'd want to find it. Nails, scraps and cut dust should all get picked up. Then comes the final walk-around. Walk it with the crew lead, look at every wall and corner, and speak up about anything that bothers you. That is the time to say so, and it's the whole point of having a 5-Year Craftsmanship Warranty behind the work.
How long it takes and what you can do
Smaller houses can move quickly, while larger or more complicated homes take longer, especially if repairs are needed or the weather doesn't cooperate. Ask for a realistic window, not a promise, and ask what happens if rain delays the work.
On your side, move vehicles away from the house, bring in anything fragile from the walls and patios, and let pets and kids stay clear of the work zone. If you'd like to talk through your own project, Oklahoma Siding offers free estimates around Tulsa, Broken Arrow and Wagner County. Call (918) 223-3987 and ask any of these questions about your own walls.
Oklahoma Siding, (918) 223-3987
Call (918) 223-3987More articles
LP Smart Siding vs James Hardie: What Swelling Looks Like and Why We Install Hardie Only
If you're comparing LP Smart Siding with James Hardie fiber cement, here is what we tell homeowners and why we only install one of them.
Five Signs of Wood Rot on Trim, Fascia and Soffits
Rot on exterior wood usually announces itself well before it becomes a big repair, if you know where to look and what to press on.